Deleting a Part File
Use extreme caution when deleting parts!
Do not delete parts until you're absolutely sure the records are no longer needed. This option deletes part records and warranty data but part transactions for work orders, purchase orders, adjustments, and so on remain on file until purged from the system.
Parts can be deleted individually through the part record in RTA Web or by part number range through the delete parts program in RTA Classic.
Deleting is rarely the right first step for a messy parts list. Duplicates should be merged, part numbers that are changing should be renumbered, old numbers can be kept findable as vendor part numbers, and parts you no longer buy can be set to Stocked = No and left on file with their history. See Safe Options Before Deleting or Replacing Parts.
Deleting a Part Through the Part Record
This option is recommended when deleting one or a few parts; the part record is displayed on-screen, enabling you to review and verify that the correct part is being deleted.
This action can be taken through RTA Web. (This option is not available to all user groups)
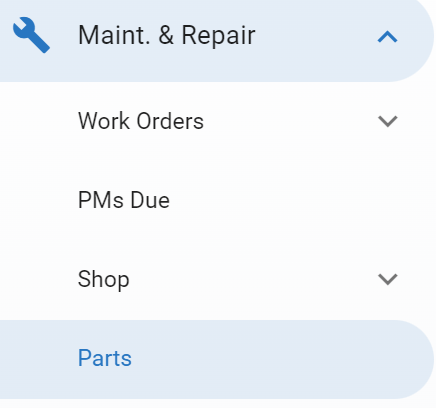
Click on the Parts Menu option under Maint & Repair
Search for or locate the part to be deleted
Click on the line item for the part
Click on “Manage Part” from the primary panel
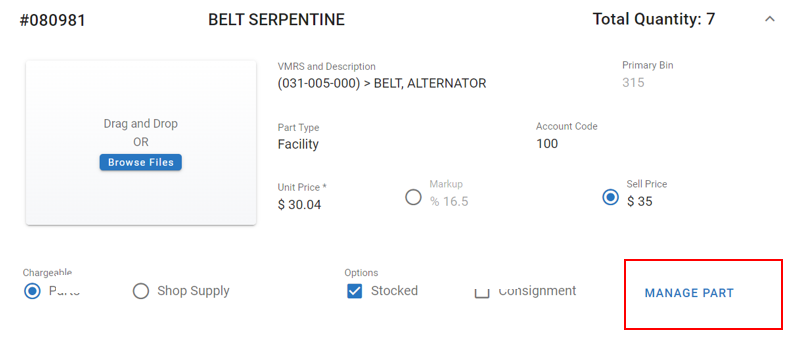
Click Delete
Confirm deletion
Deleting Parts in Bulk
Fleet360 does not have a bulk or range delete for parts. Parts are deleted one at a time from the part record, as described above.
Do not use RTA Classic utilities to delete ranges of parts. Fleet360 is the system of record, and Classic range delete programs are not a supported Fleet360 cleanup path. If you are looking at deleting a large number of parts, contact RTA Support first: inventory, purchase orders, work orders, warranty records and reporting are all affected, and there is usually a safer option. See Safe Options Before Deleting or Replacing Parts.
The most common version of this request is removing every part with zero on-hand quantity at a facility, for example after a numbering change or an old import. There is no screen or utility in Fleet360 that deletes parts by inventory level — a zero-inventory cleanup is run by RTA Support once the scope is confirmed; it is not started from the part list.
Before asking Support for a zero-inventory cleanup, be ready to confirm:
The facility or facilities it applies to — part files are per-facility, so the same part number at another facility is unaffected.
The scope — whether every part with zero on-hand quantity is included, or only certain part numbers, categories, or bins.
What should happen to parts that have history. A part with work order, purchase order, or adjustment history is usually better left on file with Stocked = No so lookups and reports keep working, rather than deleted — see Safe Options Before Deleting or Replacing Parts.
Any exclusions — parts on open purchase orders, requisitions, or work orders, in part kits, or tracked by warranty or tire records that should not be removed.
A single part with zero quantity can still be deleted one at a time from the part record (Manage Part > Delete) as described above — the Support-assisted cleanup is for clearing many records at once.
Recovering Part Deleted in Error
This option is handy if a part has been deleted in error or needs to be reinstituted. The steps for recovery are to add the part again using the rules below.
Add the part using the same part number as before
Rebuild the vendors, price, and on hand quantity in the part file
Once the part is added again, it will re-link usage and purchases. The Part Adjustments report will provide details of the delete including the on-hand quantity and price at the time of deletion to help rebuild the details of the part itself.
Locating the Part Adjustments report in Fleet360:
Open Reports
Open the Parts report category
Run Part Adjustments
Set the date range to cover the deletion; deleted parts appear with a reason of Deleted, with the quantity and price at the time of the delete