
Customer Files
The customer record contains information about the customers for whom you perform maintenance or repair work. Your customers may be other departments, cost centers, owner-operators, other companies, or any other entity that is billed for work completed. Setting up the customer file allows markups to be applied for services rendered or items sold.
If you're planning to bill customers for maintenance and repair work, contact our support@rtafleet.com for more information on how to allow this feature.
If an asset belongs to a specific customer, it's a good idea to specify the customer number in the asset file. Then, when a work order is created for that vehicle, the customer number and its customer facility automatically come up as the default.
Customers and Facilities
Customer records belong to a facility, and a customer number is only unique within that facility. Because of this, wherever Fleet360 stores a customer – on an asset, a Work Order, an estimate or a posting – it stores the customer number together with the Customer Facility (the facility that owns that customer record).
Which Customer list a facility uses is controlled by the Default Customer Facility setting on the facility’s Settings tab. Point every facility at the facility where your customer files are maintained if you want one shared customer list.
Asset record: selecting a Customer on the asset sets both the customer number and the customer facility on the asset. When a Work Order is created for the asset, both are copied onto the Work Order as the default; if you pick a different customer on the Work Order, its customer facility is used instead.
Moving an asset to another facility: the customer facility on the asset does not change unless you check Adjust Customer Facility when renumbering or bulk-moving the asset. That option is only available when the same customer number also exists in the receiving facility.
Customer Facility is not your Working Facility. The Working Facility is the facility you are signed into for the session (the selector at the top of the screen). The Customer Facility is a property of the customer record and of the asset or Work Order that references it.
Refer to Facility Settings Tab.
Refer to Renumber Asset or Change Asset Facility.
Refer to Working Facility Selection Option.
As items are posted to work orders or fuel transactions are input, any applicable markups set in the customer records are applied and added to the work orders and fuel transactions.
Adding a customer:
The customer record consists of four tabs:
The Primary Panel and General Tab
Markups Tab
Accounts Tab
Attachments Tab
It's not necessary to enter information in all four tabs though we recommend initially entering as much as possible.
To add a customer, do the following:
Click on the Organization area in the menu
Click on Customers
Click on the + (add) icon in the upper right corner

Enter the following information:
Customer # - can be alpha numeric, up to 10 characters, and must be unique. The form does not stop you typing more than 10 characters, but the record will not save (see Failed to add customer below).
Abbreviation - Use to help with search and identification of the customer as a customer number is not always known at all levels of the organization. Up to 10 characters (letters, numbers, spaces, hyphens and apostrophes) and must be unique.
Name - Full Customer Name, up to 25 characters
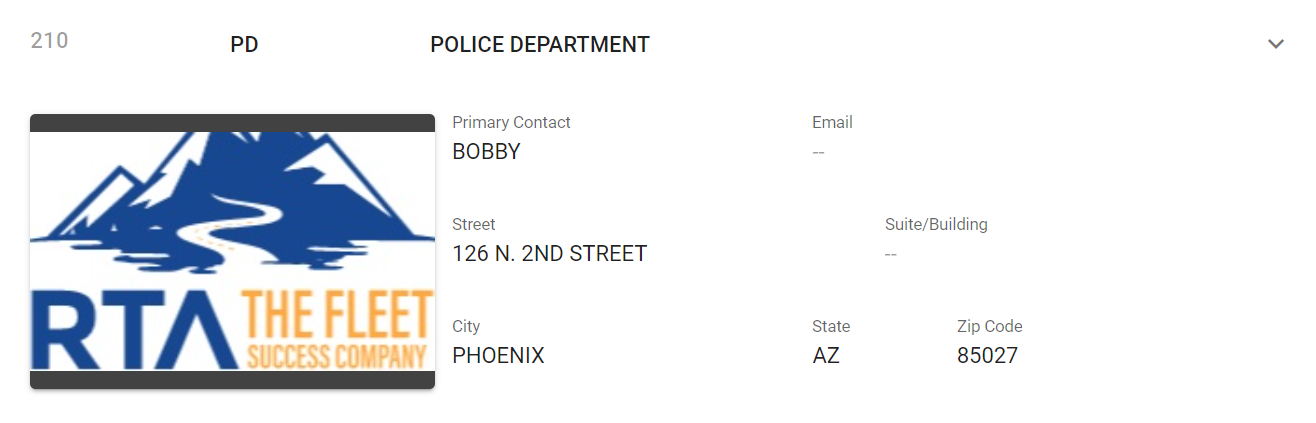
Contact Information including Primary Contact Name, Email, and address for customer
Add a customer profile picture if desired
Click Create
The screen will now display the information entered for the creation of the file and give access to the other tabs for data entry
General Tab
Add shipping and billing address information into these panels by clicking into a field, entering the information, and clicking the checkmark to save the entered data
Markups Tab
The Overhead Rate Flag must be set to customer for these to apply.
Use this tab to define markup and rate information for the customer
Posting Markups
Customer-specific markups for Parts and Labor can be defined
Click into a field, add the data, click the checkmark to save it
These markups will be applied to work order postings for this customer
The Parts markup entered here is the amount that appears in the Markup field on a work order parts posting. A markup saved on the part record is separate: it is built into the part’s sell price and therefore into the posting’s unit price. A posting can show no markup amount and still include the part markup in its price. See Posting Parts & Labor.
Rates
Override Labor Rate - Activate an override for labor rate and enter a labor and/or labor tax percentage to be used instead of the individual employee labor rate when work is done for this customer
Shop Supply Rate - Many shops apply this fee to recoup costs for non-chargeable items such as grease, lubricants, nuts, bolts, and disposal and environmental fees. Set those percentages and make the appropriate selections. The shop supply rate will be applied to the labor rate and can be viewed on the bottom of the printed WO under “Shop”.
The Shop Supply Rate is only used when the Overhead/Shop Supplies system switch is set to Customer. If it is set to Facility, Fleet360 uses the facility overhead percentages instead. See Shop Supplies and Overhead Charges.
The additional amount charged is calculated by multiplying the total (inside) labor cost posted on work orders by the specified rate. Select the Tax Shop Supplies checkbox to include shop supply costs in the base amount when tax and/or GST tax is calculated.
Tax Rate - The sales tax percentage applied to parts and tires posted on work orders for this customer. It is also the rate used for outside parts and tires when Tax Outside Parts is selected.
Tax Outside Parts - Select this checkbox to charge tax on outside parts and outside tires posted to this customer’s work orders (Outside Work jobs, including parts received on a purchase order linked to the work order). The tax is calculated at the Tax Rate above. When the box is clear, outside parts and tires are not taxed even though in-house parts are. Outside labor is never taxed.
Calc GST Rate - For Canadian and Australian customers - Enter the goods and services tax rate (Canadian and Australian customers). Select a radio button to indicate if the tax is to be calculated using the Linear or Compounding method. The GST rate is multiplied to total labor, parts, tires, warranty, outside, and shop supply costs (if applicable) posted on work orders.
Fuel Markup
To apply a markup to fuel for this customer, select a fuel type from the drop down, click the +, choose the method, and add the markup amount/value
Methods are as follows:
Add To - add an additional dollar amount
Flat Price - apply a flat price per gallon
Percent - a flat markup percentage can be applied to the per gallon price
Outside parts on a work order show no tax? Check Tax Outside Parts on the customer’s Markups tab first — this is the setting that controls it. The Add Tax to Part Cost switch (Admin → System Switches → Parts) is not involved: it only decides whether the tax you pay a vendor is rolled into the part’s average cost when a purchase order is received. The taxing entity and rate on the purchase order line control the tax you pay the vendor, not the tax charged to the customer on the work order. Tax on an open work order is recalculated from the customer’s current settings; once the work order is closed and its tax has been posted, the amount is fixed and the work order has to be reopened to correct it. See Work Order Cost Totals: What Each Amount Includes.
Accounts Tab
Additional account codes can be entered for the various items. The use of account codes is purely for company benefit and these are not used by RTA in any way
Custom Fields Tab
For information on how to setup the Customer Custom Field Categories see the Customer Custom Fields section.
Follow these steps to add and update a custom field on a customer record:
Access the Customer Record
Navigate to Organization > Customers
From the list of customers, select the customer you want to edit
Open the Custom Fields Tab
In the selected customer’s record, click on the "Custom Fields" tab
Add a Custom Field
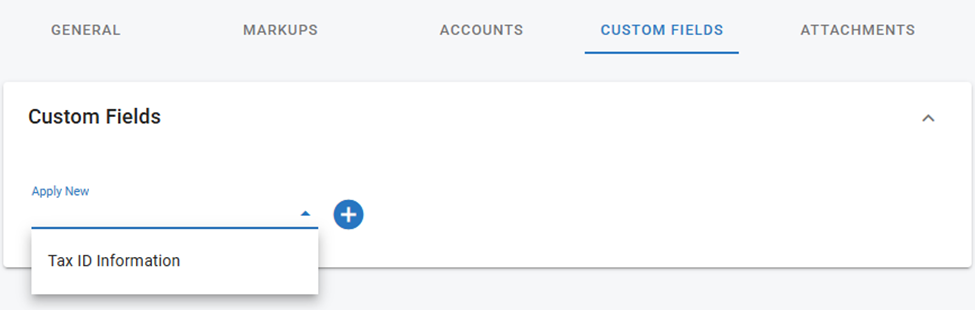
Click the dropdown menu to view available custom fields
Select the field you want to add, then click the plus
 icon to apply it to the customer record
Update the Field Information
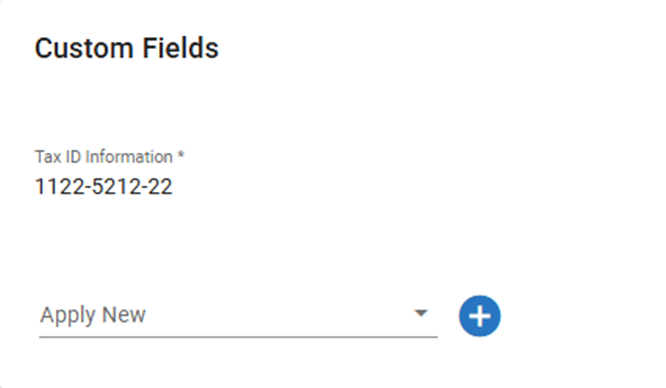
Once the field is added, it will appear in the list and is ready for input
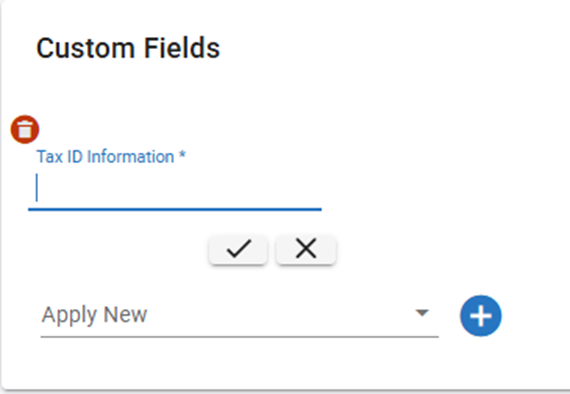
Enter the necessary data, then click the check mark to save the information
Important Notes:
If the field is marked as required, it will appear in red.
You will not be able to proceed until all required fields are filled in.
Conclusion
Implementing this feature significantly enhances Fleet360’s flexibility and enterprise readiness by allowing users to tailor customer records to their needs and manage this at scale. It builds on existing patterns for consistency while introducing new bulk import capabilities.
Attachments Tab
Attachments can be added to the customer file. Refer to Attachments if assistance is needed in using this feature.
Troubleshooting: “Failed to add customer”
Customer #, Abbreviation and Name are required, and Abbreviation and Name have character limits. Problems with these are reported on the field itself before you click Create - a red message under the field (for example “Customer abbreviation already exists”), or a required custom field shown in red on the Custom Fields tab. The Create button does not send anything until those are fixed.
The message Failed to add customer is different: it means the entries passed the on-screen checks, but the record was rejected when it was saved. The most common cause is a Customer # longer than 10 characters - the field does not warn you while typing, but the customer number cannot be stored with more than 10 characters.
Shorten the Customer # to 10 characters or fewer.
Check that Abbreviation is 10 characters or fewer and Name is 25 characters or fewer.
Click Create again.
“Failed to add customer” is not caused by a missing required field - required fields are always flagged on the screen first.
Changing a customer:
To change a customer record, do the following:
Click on the Organization area in the menu
Click on Customers
Locate and click on the customer to be edited
Navigate to any editable field in the file
Click in the field and edit or add the value desired
Click the check mark while in the edited field to save the changes
Deleting a customer:
To delete a customer record, do the following:
Click on the Organization area in the menu
Click on Customers
Locate and click on the customer to be edited
Click Delete in the upper right-hand corner