Fuel System Switches
This document will go into details on setting and using the system switches found under the Purchase Order System Switches tab by navigating to Admin → System Switches → Fuel The document includes the switches listed below and clicking on any one of the listed items will take you to their location in the document.
Odometer Prompt
The Odometer Prompt Fuel Switch controls whether or not prompts for meter and alternate meter updates will be asked for on work order and/or fuel entries.
Access the Odometer Prompt switch by navigating through Admin → System Switches → Fuel → Odometer Prompt
Use the Odometer Prompt dropdown to select the appropriate prompt setting for the fleet
No = Select if not wanting meter reading prompts on work orders and fuel
Yes = Select if wanting meter reading prompts on work orders and fuel
Yes with Alt Meter in WO and Fuel = Select if wanting meter reading prompts AND alternate meter reading prompts on work orders and fuel
Yes with Alt Meter in WO = Select if wanting meter reading prompts on work orders and fuel AND alternate meter reading prompts on work orders
Yes with Alt Meter in Fuel = Select if wanting meter reading prompts on work orders and fuel AND alternate meter reading prompts on fuel
Toggle the Allow Odometer Pass-By on or off
On = users can skip the odometer update when presented with it
Off = the odometer field MUST be filled in to continue
Set the Days Between Odometer Updates field
This states the maximum time to elapse between odometer updates (in days)
This means that the prompt will appear every xx days ensuring that the maximum is not exceeded
Click Save
Be aware that if using Paperless Shop, visit the Work Order System Switches and activate the toggle for the odometer prompt for technicians when in paperless shop if wanting the prompt for odometer updates in Paperless Shop.
Company Fuel Taxable
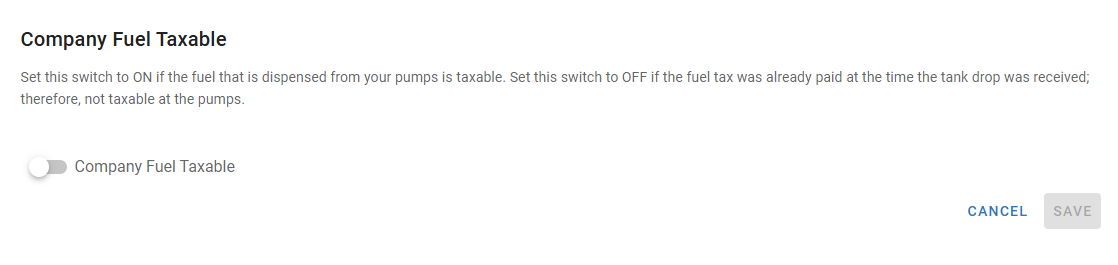
Use the Company Fuel Taxable toggle to set whether the fuel that is dispensed from onsite pumps is taxable or not.
Access the Odometer Prompt switch by navigating through Admin → System Switches → Fuel → Company Fuel Taxable
Toggle Company Fuel Taxable to on (system default is off)
On = company fuel from onsite pumps is taxable
Off = company fuel from onsite pumps is not taxable due to tax already being paid with fuel drop off
Click Save
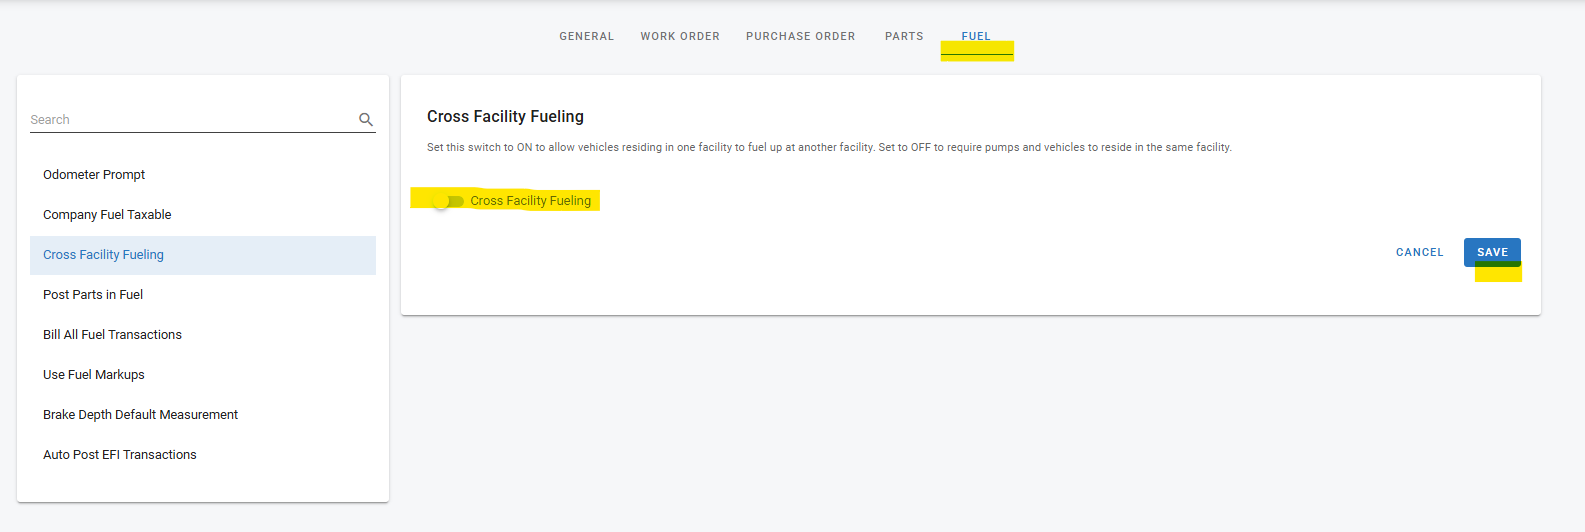
Cross Facility Fueling
The cross facility fueling switch allows fleets to access and post fuel entries to assets across facilities and not just through the facility the asset is assigned.
Access the switch by expanding the Admin section of the main menu
Click System Switches
Click on the Fuel Tab
Click on Cross Facility Fueling
To allow this feature, simply toggle the switch to the “on” position and click save
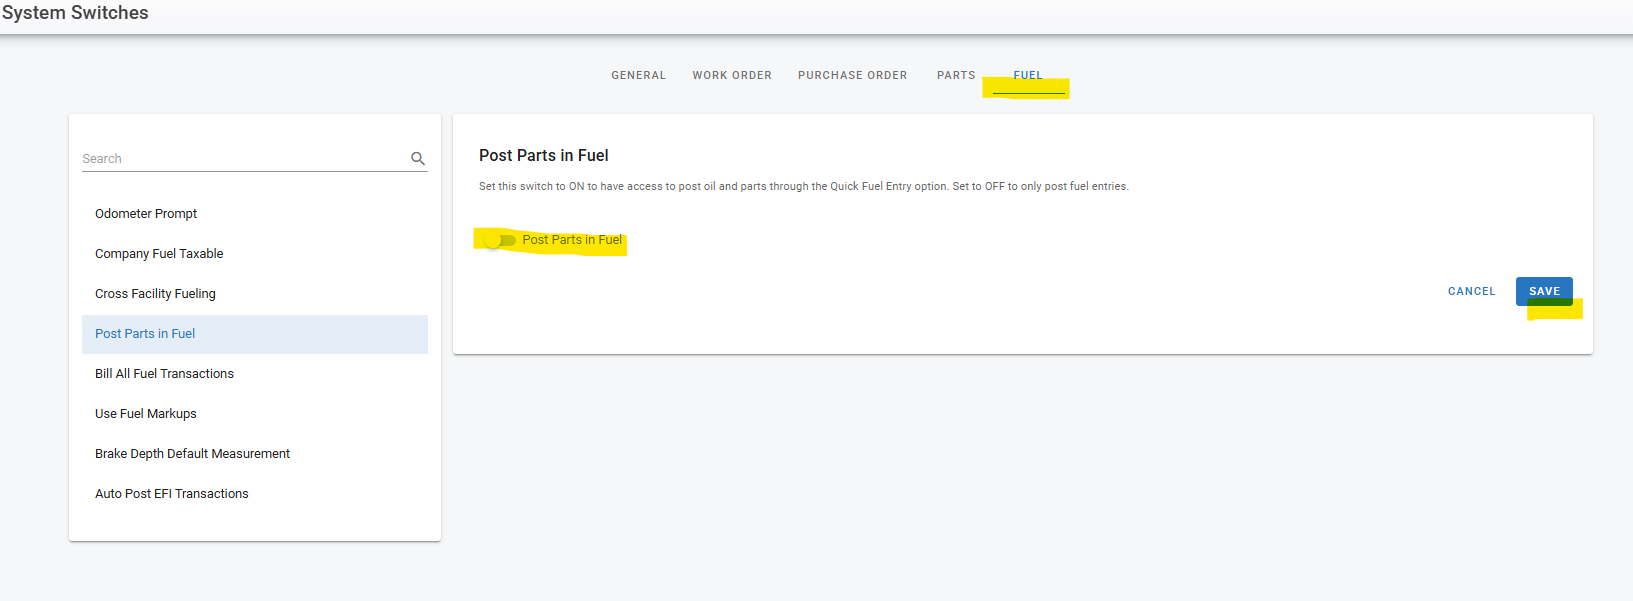
Post Parts in Fuel
The Post Parts in Fuel switch allows users to post parts in addition to fuel when posting in the fuel entry screen. This comes in handy when needing to post things like fluid top offs and small parts items like windshield wipers quickly to an asset outside of a typical work order.
Access the switch by expanding the Admin section of the main menu
Click System Switches
Click on the Fuel Tab
Click on Post Parts in Fuel
To allow this feature, simply toggle the switch to the “on” position and click save
Bill All Fuel Transactions
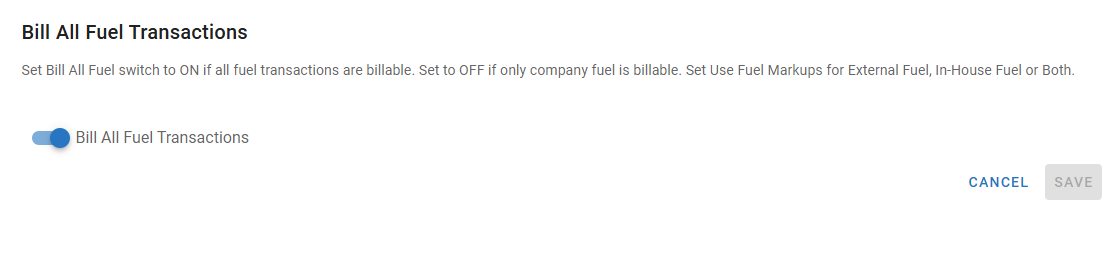
Use the Bill All Fuel Transactions toggle to set whether fuel transactions are billable all the time or only at company level.
Access the Odometer Prompt switch by navigating through Admin → System Switches → Fuel → Bill All Fuel Transactions
Toggle Bill All Fuel Transactions to on (system default is on)
On = all fuel transactions are billable
Off = only company fuel is billable
Click Save
NOTE: The switch description also mentions setting “Use Fuel Markups” for external fuel, etc. That is a separate switch and the setting for that aspect is not contained within the “Bill All Fuel Transactions” To set the parameter for the use of fuel markups, visit the “Use Fuel Markups switch also located in the Fuel tab in System Switches.
Use Fuel Markups
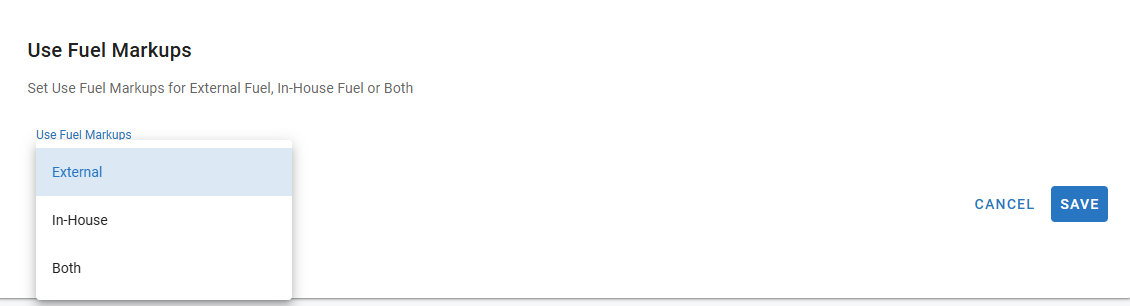
Leverage the Use Fuel markups switch to denote where fuel markups will be used.
Access the Odometer Prompt switch by navigating through Admin → System Switches → Fuel → Use Fuel Markups
Make the appropriate selection from the Use Fuel Markups dropdown
External = Markups will only be used for external fuel transactions
In-House = Markups will only be used for in-house fuel transactions (those that use internal pump numbers)
Both = Markups will be used for both External and In-house fuel transactions
Click Save
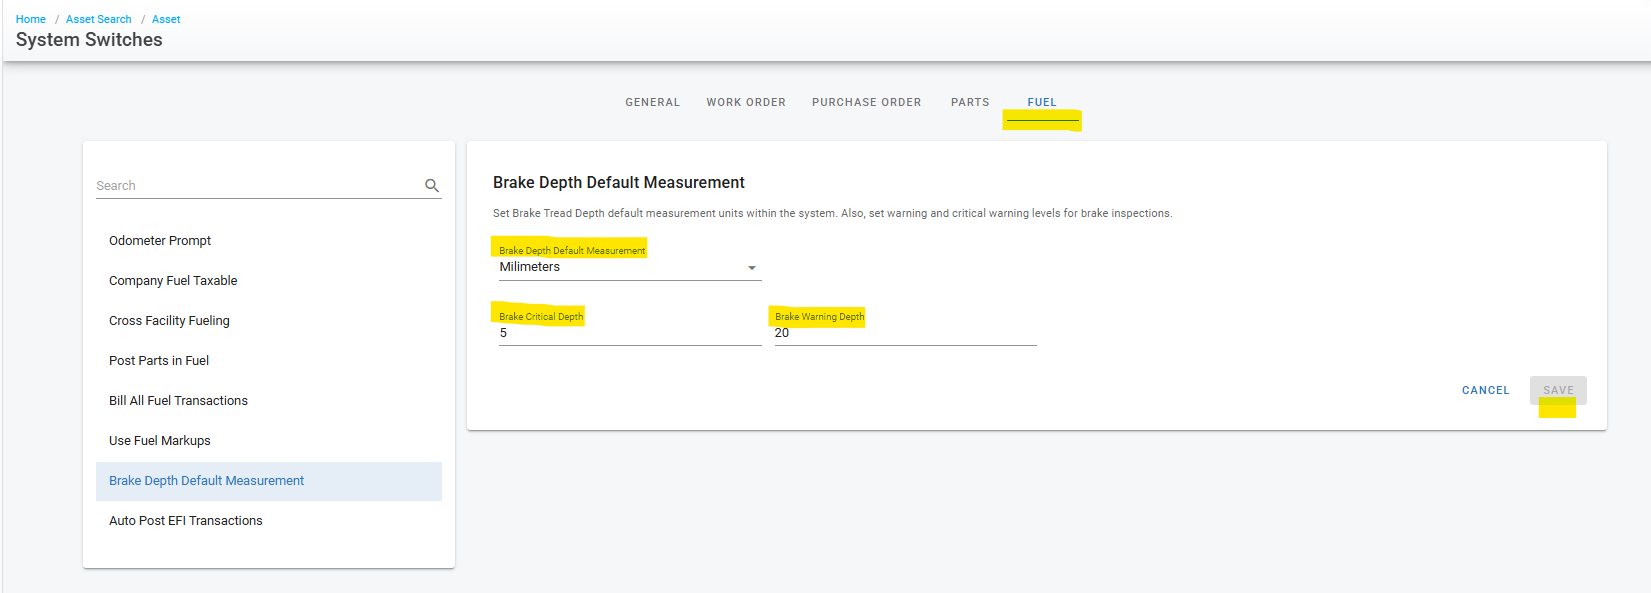
Brake Depth Default Management
The Brake Depth Default Management switch allows fleets to streamline the default brake tread depth measurement units within Fleet360 as well as create thresholds for warnings when those depths are starting to get low or well past the depth of needing replacement. These defaults will be applied to the assets in Fleet360 automatically.
These defaults can be adjusted at the asset level on an individual basis where necessary
Access the switch by expanding the Admin section of the main menu
Click System Switches
Click on the Fuel Tab
Click on Brake Depth Default Measurement
Use the drop down to select the default unit of measurement (Inches, Millimeters, Percentage, or 32nds)
Using that unit of measurement as a guide, enter what the fleet would consider the Brake Critical Depth (needs replacing NOW) and what would be a Brake Warning Depth (needs replacing soon)
Click Save
Refer to Brake Inspection Setup for instructions on how to override the default measurement settings at the asset level
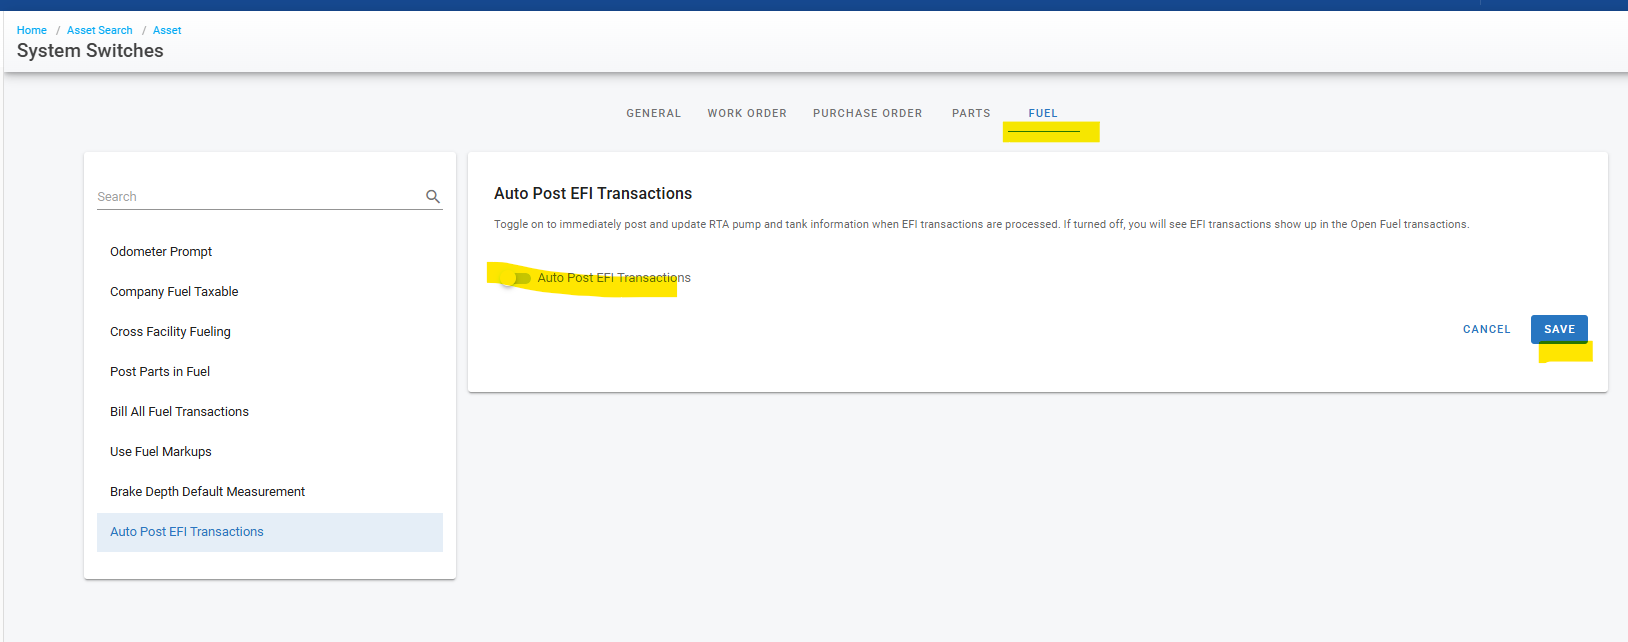
Auto Post EFI Transactions
The Auto Post EFI Transactions switch applies to fleets using EFI (Electronic Fuel Interface) for fueling transactions. A status of open or closed is associated with those transactions. The switch determines whether or not you want to auto post/auto close those EFI transactions.
Open transactions mean that the transaction has been posted and the vehicle has been updated but it hasn’t hit your pump or tank yet which may be relevant for tracking variances
Access the switch by expanding the Admin section of the main menu
Click System Switches
Click on the Fuel Tab
Click on Auto Post EFI Transactions
Use the toggle to determine when fuel transactions are considered “closed”
Toggle on to auto-close EFI transactions
Toggle off if wanting to track the pumps and tanks (coming soon) and users will have a process to they can manage to close those transactions
Click Save