Meter Readings and Corrections
Understanding the Various Meter Types
RTA tracks several types of asset meters. It's important to understand how they work because asset cost per mile and miles per gallon reports use the various meters. The meter types are as follows:
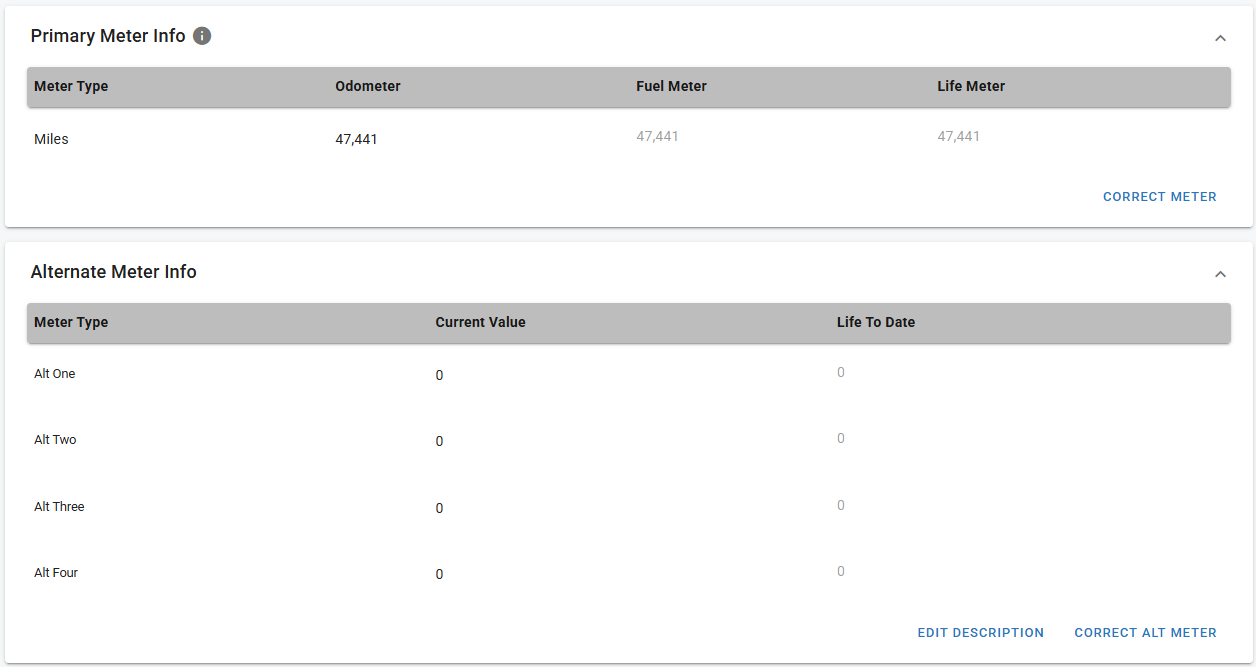
Odometer: This is the current asset meter reading, sometimes referred to as the work meter.
Fuel Meter: When used, this meter will drive the other two. For example, when updating the fuel meter with fuel entries, the Odometer and Life Meter will update with it. This is tracked separately from the primary meter to ensure MPG figures are properly reported.
Life Meter: This is the accumulated miles traveled for the life of the asset. The life miles can have the same or higher reading than the Primary and Fuel meters, but never a lower reading. Life miles continue to increase even though Primary meters may rollover or get reset to 0 when replaced.
Alternate Meter: This is the meter reading for other types of meters that might be on the asset (e.g., hours, yards, cases). This meter has no ties to the Primary or Fuel meters.
All of these are displayed in the asset file in RTA on the Asset Management Tab.
Primary and Alternate Meter Readings are often updated via Work Orders. Refer to Meters in Work Orders for instructions on updating meters through Work Orders.
If you need to update the primary odometer reading for multiple assets, save the clicks and use the Odometer Update action from the asset search list. Refer to Odometer Updates for details on using this feature.
Primary Meter Reading
Viewable
The current Primary Meter Reading can be seen in the following areas:
Asset File - Primary Information Banner
Asset File - Asset Management Tab
Work Order - Asset Information Banner
Editing
The Primary Meter reading can be edited from the asset file and through work orders.
Work Orders should have the primary meter updated to the current reading. If there is an error in the meter reading, that should be done through the vehicle file using one of the options below.
Refer to WO Meter Updates for information on updating a primary meter through a work order.
Correction
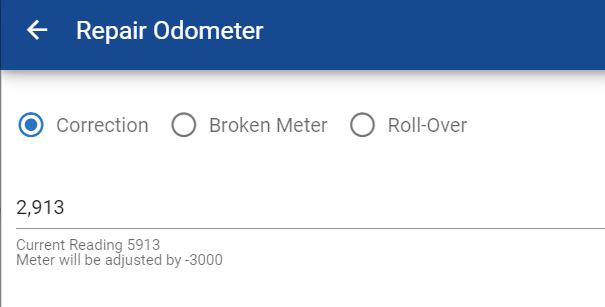
Errors can happen when meter readings are updated or input when adding a vehicle. RTA can help with correcting a meter reading by following the below steps. The correction feature will update the Odometer, Fuel, and Life Meter.
Locate the appropriate Asset File by selecting Assets from the main menu
Search for and click on the appropriate asset to open the file and navigate to the Primary Meter Info Banner on the Asset Management tab
Click on Correct Meter
The Correction option should already be selected (if not, be sure to select it)
Type in the current meter reading for the asset
Below that, the figures will adjust automatically displaying the current reading (incorrect reading being corrected) and the adjusted amount
Click Save at the bottom
Broken Meter
Replacing a broken meter will need to be done on occasion. Follow the steps below when this occurs.
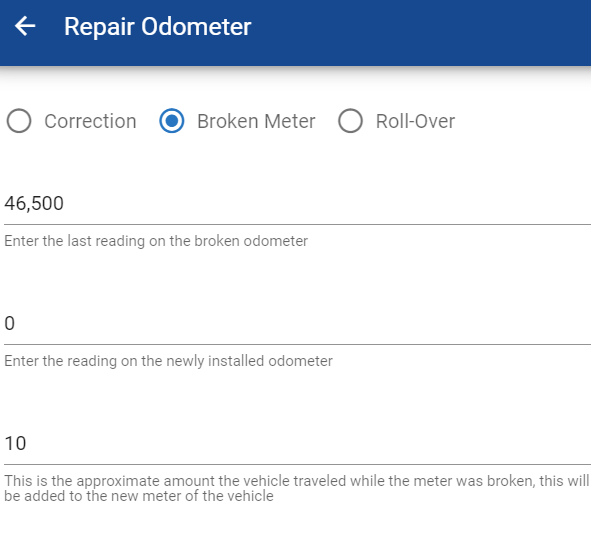
When performing the broken meter action, the primary odometer will be updated to the value set as the corrected meter reading, the life meter will be set to the sum of the broken meter reading and the unaccounted for meter units. The fuel meter is not touched.
Open the asset file and navigate to the Primary Meter Info Banner on the Asset Management tab
Click on Correct Meter
Click the Broken meter Option
Enter the last reading on the broken odometer
Enter the reading on the newly installed odometer
Enter the approximate amount the asset traveled while the meter was broken
This will be added to the new meter of the asset
Click Save at the bottom
Rollover
Once an odometer reaches its max count, it will roll back over to zero and start over. Ensuring that the asset file is capturing the full life correctly, an adjustment would need to be made. Follow the steps below when an odometer rollover occurs.
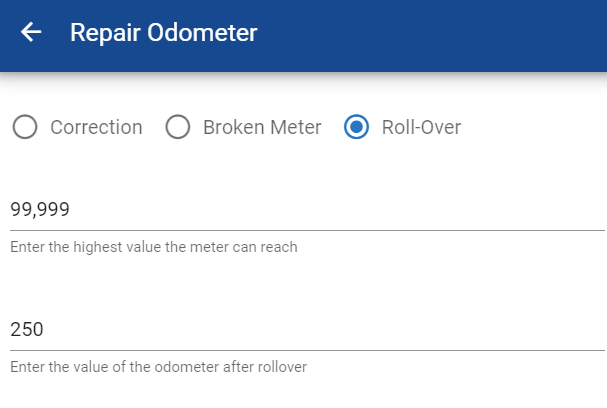
When performing the rollover correction, the current primary odometer will be set to the new meter reading entered and the life meter will be calculated by subtracting the current odometer reading from the maximum meter reading entered and then adding that the current life meter.
For example:
Truck B’s meter rolled over at 100,000 miles
The current meter reading for Truck B was listed in RTA as 1,500 miles
The new meter installed has a reading of 0 miles
Truck B’s current life meter is 45,250
100,000-1,500 = 98,500
45,250 + 98,500 = 143,750
After the rollover action, the new current odometer will show as 0 and the new life meter will show as 143,750
Open the asset file and navigate to the Primary Meter Info Banner on the Asset Management tab
Click on Correct Meter
Click the Roll-Over Option
Enter the highest value the meter can reach (this is the max value before the odometer rolled over)
Enter the value of the odometer after the rollover (this is the reading that the rolled over meter is now displaying)
Click Save at the bottom
Alternate Meters
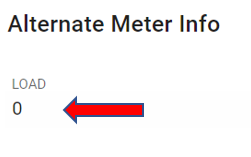
An alternate meter may be another meter such as an engine or component hour meter OR it may represent items transported by the asset such as passengers, cases, boxes, tons, yards, and pallets.
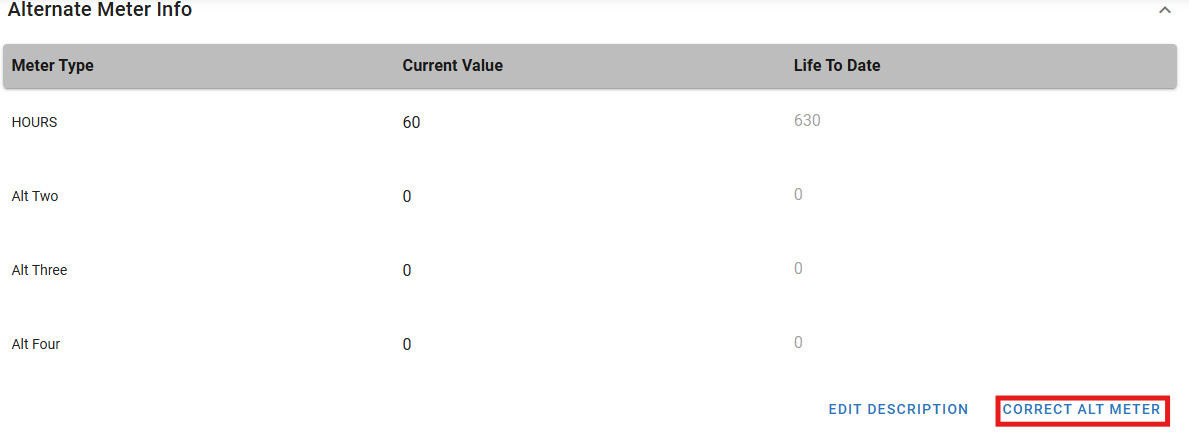
Up to 4 alternate meters can be assigned to an asset. Once they are assigned, they can be viewed in the Alternate Meter Banner in the asset file.
Alternate meters can be used to help determine when PM services are needed. For example, if the asset has a standard odometer and an hours meter, the hours meter can be set up as an alternate meter and the PMs can be set up to be tracked by days, miles, and hours.
Current and Life alternate meter readings can be tracked. For example, imagine you’re tracking engine hours as an alternate meter for a police squad car, which idles quite a bit. The engine fails after 20k miles, but the rest of the asset is still in great condition. You decide it’s worth replacing the engine block, which resets the trackable engine hours back to 0, but the rest of the asset still has the 20k hours of use on it. adding 10 engine hours to the asset will show as 10, but the Alternate LIFE hours will now be 20,010.
Setting Up Alternate Meter Types
Prior to assigning an alternate meter to an asset, the types/descriptions of alternate meters available for use need to be created.
To define the types of alternate meters available for use in asset files, follow the below steps.
Under the Assets tab in the main menu, click on Settings
Click on Alt Meters
On the Alt Meter Maintenance Screen, click the New Alt Meter Button
On the added line, type in the alternate meter description/type to be available
Click the check mark to save the new description
The Alt Meters option under the Admin System Settings is also where a user can delete an alternate meter type and edit those descriptions as well.
Adding Alternate Meters to the Vehicle
Once the alternate meter types have been set up, they can be applied in to assets. An asset can have up to 4 alternate meters assigned to it.
Follow the below steps to include alternate meters into the asset file.
Open a asset file
Navigate to the Alternate Meter Info banner on the Asset Management tab
Click Edit Description
Click in the fields below the Alt One header
Select the appropriate alternate meter type from the list
Click the check mark
If the asset will have additional alternate meters, continue steps 4-6 for alt two, three, and four where applicable
Once all alternate meter types are entered, click done
Once the meter types are are added, the headers will now display instead of Alt One, Two, Three, or Four
To add the meter reading for each alternate meter, click in the field below the appropriate meter type heading
Enter in the appropriate value
Click the check mark
Editing Alternate Meter Readings
Once the alternate meter types and values have been set up, they can be edited in the asset file. Refer to the Adding Alternate Meters to the Asset section of this document for set up instructions.
Correcting Alternate Meter Readings
Just as with the primary meter, errors can happen with the alternate meter when meter readings are updated or input when adding a vehicle. Correcting an alternate meter reading consists of the same options and steps as the primary, only in a different location.
Locate the appropriate Asset File by selecting Assets from the main menu
Search for and click on the appropriate asset to open the file and navigate to the Alternate Meter Info Banner on the Asset Management tab
Click on Correct Alt Meter
Select the Alternate Meter Type to be adjusted using the dropdown
Select the appropriate option for the alternate meter in question.
Correction
Click the Correction radial option
Type in the current meter reading for the asset
Below that, the figures will adjust automatically displaying the current reading (incorrect reading being corrected) and the adjusted amount
Click Save at the bottom
Broken Meter
Click the Broken meter Option
Enter the last reading on the broken odometer
Enter the reading on the newly installed odometer
Enter the approximate amount the asset traveled while the meter was broken
This will be added to the new meter of the asset
Click Save at the bottom
Rollover
Click the Roll-Over Option
Enter the highest value the meter can reach (this is the max value before the odometer rolled over)
Enter the value of the odometer after the rollover (this is the reading that the rolled over meter is now displaying)
Click Save at the bottom
