Scheduling Reports
The scheduler allows you to run reports regularly at specified times. This can be useful for reports which are based on periods of time, such as weekly sales reports or quarterly earnings reports.
Making a Schedule
Schedules are created and edited with the Schedule Report wizard, which is a tool designed to streamline schedule creation.
To schedule a report:
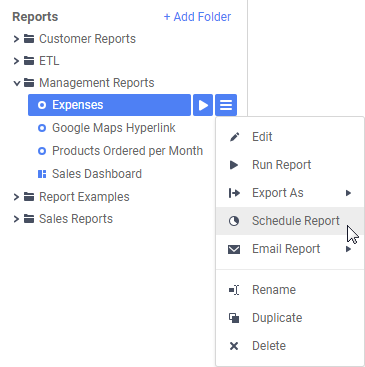
Click the Menu icon and selectSchedule Report.
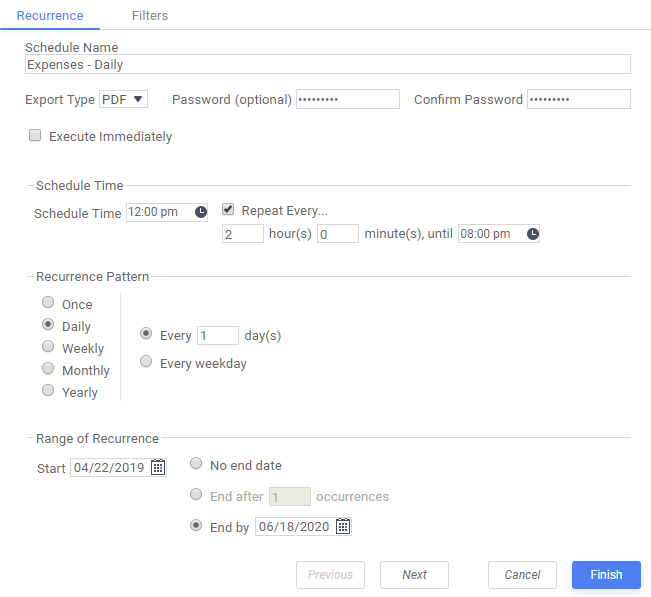
Enter a Name for the schedule.
Choose which file type to save the report as.
Optional: For PDF or Excel, enter a Password to secure the report.
Select a date and time for the schedule, and choose how often it should run:
In the Schedule Time field, enter a time for when the schedule should run.
Optional: To run the schedule as soon as it is created, select the Execute Immediately check box. This schedule cannot be given a recurrence pattern. Go to step 6.
Optional: To run the schedule multiple times per day, select the Repeat Every check box and enter a time for how often it should repeat.
Optional: To run the schedule on more than one day, choose a Recurrence Pattern from the available options:
Daily
The schedule will repeat every day, every weekday, or every number of days. Enter a number of days for how often the schedule should repeat, or select Every weekday to run it every Mon, Tues, Wed, Thurs, and Fri.
Weekly
The schedule will repeat every week, or every number of weeks, on one or more days. Enter a number of weeks for how often the schedule should repeat, and select one or more days when it should run.
Monthly
The schedule will repeat every month, or every number of months, on a certain day. Enter a day for when the schedule should run, and a number of months for how often it should repeat.
Yearly
The schedule will repeat every year on a certain day. Enter a day for when the schedule should run.
Optional: If you have entered a recurrence pattern, enter a date for when the schedule should Start.
Optional: To add filters to the report click the Filters tab. If the report already has filters you can set their values here. See Filters for instructions.
Optional: To email this schedule to addresses from a database, see Emailing personalized reports below.
Click the Recipients tab. To send the report to a list of email addresses, select the Email Reports check box and fill out the following fields:
Enter the recipients' email addresses in the To, Cc, and Bcc fields.
Optional: Enter an email subject in the Subject field.
Optional: Enter an email message in the large text field.
If you do not want to email the report, clear the Email Reports check box. The report will be saved to disk instead. You may have to ask your administrator for the file location.
Optional: If this is a batch schedule, an Attach Report Output to Email check box is available. Clear this check box if you want to use this report to send alerts, and you do not want to email the report itself.
Click Finish to save the schedule.
Schedules can be edited after they are created. See Viewing schedules below for more information.
Viewing Schedules
To see the schedules that have been created click the Schedule Managericon. Each schedule is on a row with its most recent and forthcoming run times and a status indicating its condition.
Ready
The schedule will run on its next run time.
Running
The schedule is currently running.
Transmitting
The scheduled event has finished running, and the report is being sent to the user.
Completed
The schedule has completed its final event, and will not run again. It will be removed from the list when the cache is flushed.
Deleted
The schedule has been deleted, and will be removed from the list when the cache is flushed.
Abended
The last run failed due to an error. The schedule will not run again.
User Aborted
The schedule is running, but it was requested to be canceled. It will be marked as Deleted.
Scheduled events which have passed are copied to an archive row, so that there is a log of previous run times. Such events are labeled (archive). Deleting these rows will not affect the main schedule.
Completed and canceled schedules and archives may be periodically removed from the list. Click Flush to remove them immediately.
Managing schedules
To edit an existing schedule click the Edit icon. Changes to the recurrence pattern will affect all forthcoming run times. You can reuse or reset deleted or completed schedules by editing them. This will set their status to Ready.
To delete a schedule click the Delete icon. This sets its status to Deleted. If the schedule is already marked as Deleted, this removes the schedule from the list.
Emailing a Report Immediately
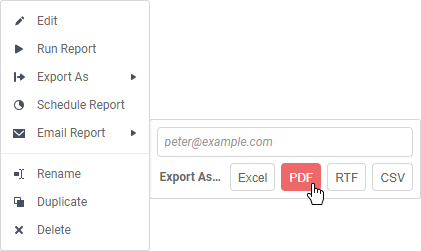
In addition to creating a recurring schedule, the application provides the option to email a report execution immediately. To do this, simply select the desired report to email and select the Email Report option from the dropdown menu. Users are then prompted to fill out the email address and select the output format for the report.
Batch Emailing Personalized Reports
Batch scheduling allows you to send personalized versions of reports to a list of email addresses. The addresses must be defined in a data category, the unique key of which is used as a blanket filter for the report. Each recipient receives a customized version, filtered by their unique key.
For example, if you wanted to send out a customized sales review, or a pre-filled tax form, or even a set of customized forms for each employee, batch scheduling allows you use one report for every person. This also has the benefit of only needing to run the report once. So you are not making repeated calls to the database, which could be slow and system-intensive.
Warning: Batch emailing should only be used as instructed by your administrator. If you are unsure about how to proceed, do not create a batch schedule. Ask your administrator for assistance.
In order for batch scheduling to work properly, it requires access to a data category with a column of email addresses that must be either located within or joinable to the underlying table. This data category can be added in the Categories menu of the report. If this column does not exist, the report will abend with the following error:
System.Exception: Batch email column has n join logic to attach to report.
Note: The category containing the email addresses for batch scheduling does not need to be added to the report itself.
To make a batch schedule:
In the Schedule Report Wizard, click the Batch tab.
Select the Run as Batch Report check box.
Optional: In the To and Cc fields, enter addresses to send a summary email for each completed execution.
From the Batch Email Field list, select the data field containing the email addresses for this schedule. Fields can contain a list of email addresses, separated by semicolons (;), as of v2017.3.8+.
Optional: Click the Recipients tab to enter a subject and message for the batch email.
You can reference data values from the email address data row in the message body. Type the parameter @batch_column@, where column is the name of a data field in the address category (in lowercase text). The value of the field replaces the parameter text in the message output.
Tip: The To, Cc, and Bcc fields are unavailable when using Batch.


