Purchase Order System Switches
This document will go into details on setting and using the system switches found under the Purchase Order System Switches tab by navigating to Admin → System Switches → Purchase Order. The document includes the switches listed below and clicking on any one of the listed items will take you to their location in the document.
Use PO Approval
Access the switch by navigating to Admin → System Switches → Purchase Order → Use PO Approval
The Use PO Approval toggle determines whether an approval hierarchy and thresholds will be used in RTA for Purchase Orders. Toggle it on or off and click save based on the needs of the fleet.
The toggle is defaulted to off on all systems until changed.
If turning on approvals, be sure to set up approval mechanisms and understand the process. Refer to Purchase Order Approvals Process for more details.
PO Max Lines
Use this switch to set the maximum number of lines allowed on an individual purchase order.
Access the switch by navigating to Admin → System Switches → Purchase Order → PO Max Lines
Update the number in the PO Max Lines field (RTA system has a max of 99)
Click Save
Use PO Prefix
This switch allows the ability to either enter a prefix number to a purchase order number or use a default prefix number. Prefixes are sometimes used as designators for accounting.
Access the switch by navigating to Admin → System Switches → Purchase Order → Use PO Prefix
Turn the toggle on if wanting to utilize PO prefixes
Set a default prefix if wanting to ensure the same prefix on all purchase orders
Click save
Use PO Suffix
This switch allows the ability to either enter a suffix number to a purchase order number or use a default suffix number. Suffixes are sometimes used as designators for accounting.
Access the switch by navigating to Admin → System Switches → Purchase Order → Use PO Suffix
Turn the toggle on if wanting to utilize PO suffixes
Set a default suffix if wanting to ensure the same suffix on all purchase orders
Click save
Purchase Order Numbering
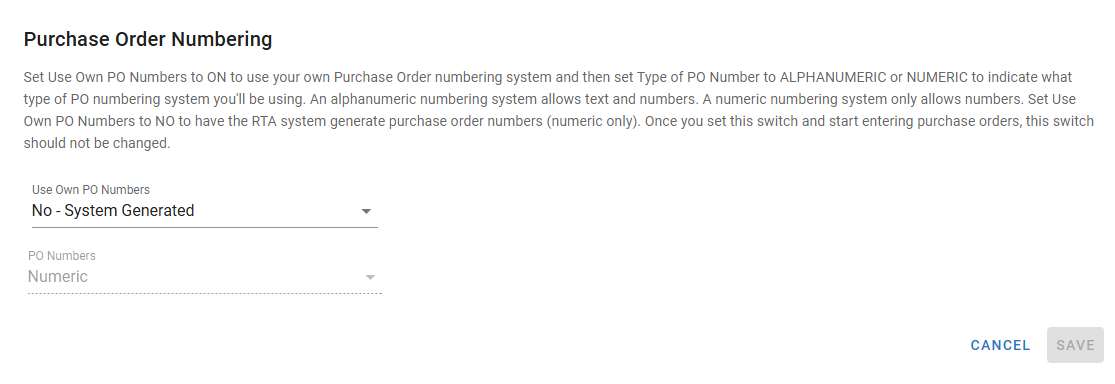
The PO Numbering switch allows the fleet to determine how purchase order numbers are generated. A fleet can have RTA auto generate the PO number or can use their own PO numbers.
Access the switch by navigating to Admin → System Switches → Purchase Order → Purchase Order Numbering
Using the dropdown, select the option most appropriate
No - System Generated = This option means that RTA will auto-create and assign a Purchase Order number for each purchase order created. (this is the default system setting and these PO numbers are numeric only)
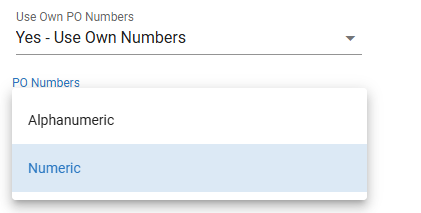
Yes - Use Own Numbers = When creating a purchase order in RTA, the user will need to enter the desired PO number by hand (the number does need to be unique. Numbers cannot be repeated across multiple POs)
The second option to select is whether the manually created PO numbers should be numeric only or alphanumeric
Click save
Post Part to WO
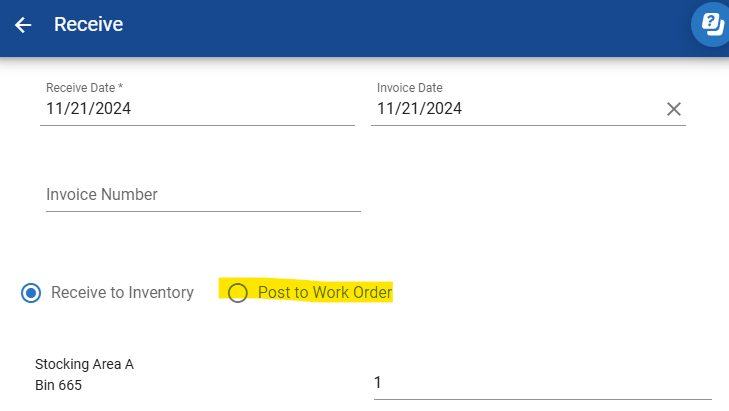
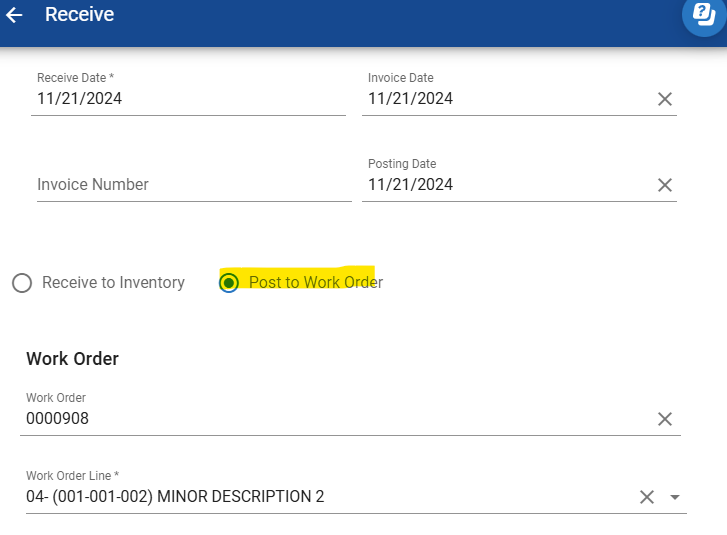
When parts are received that need to go to a work order, using the post to work order feature with purchase orders can be a time saver as it will allow the user to post the received part directly to the necessary work order without needing to post it to inventory first and then doing a secondary posting to move it from inventory to the work order.
The switch can be set three ways.
Access the switch by navigating to Admin → System Switches → Purchase Order → Post Part to WO
Choose the appropriate setting for the fleet
Yes = When receiving parts on a purchase order, a prompt exists to post the part to a work order by entering the work order number and line
No = The feature to post to a work order direct from the purchase order is not available
Auto = If the purchase order line is tied to a work order line, it will default to the Post to Work Order prompt with the line info filled in AND still offer the Post to Work Order prompt to manually add and post when the work order information was not input on the po line at creation
Click Save
Close WO if Parts Pending
Sometimes parts need to be ordered to fulfill a work order. The Close WO if Parts Pending toggle determines whether a work order can be closed while parts on order that are attached to that work order can be closed prior to the parts being received.
Access the switch by navigating to Admin → System Switches → Purchase Order → Close WO if Parts Pending
Set the toggle to on or off (allow or disallow) the closing of a work order while parts are still pending on order and click save.
Use Account Codes
This switch is tied, in part, to the Part Account Settings feature. Parts can have account codes (GL codes attached to them for billing/accounting purposes)
The Use Account Codes switch for Purchase orders allows for controls around those account codes when parts are added to purchase orders. There are three options for this switch and they are defined below:
Access the switch by navigating to Admin → System Switches → Purchase Order → Use Account Codes
Select the appropriate option for the fleet:
Yes = If the part file has an account code assigned to it, it will pull into the PO line automatically and if it does not have an account code assigned, the user can manually enter an account number when adding the line to the Purchase Order
Validate = Account codes from part files or the default account codes can be used but a user can only use an account code that already exists in the system when needing to add it to the purchase order line
No = the account code field is skipped on purchase order lines
Click Save
Default Account Code
This switch is tied to the Use Account Codes switch mentioned previously. If the “Use Account Codes” switch is set to YES or Validate, a Default Account Code can be set up with this switch that will be used on a purchase order line where the part does not already have an account code assigned to it.
Access the switch by navigating to Admin → System Switches → Purchase Order → Default Account Codes
Enter the default account code to be used
Click Save
Purchase Requisitions
The Purchase Requisition Toggle controls whether the fleet will be utilizing the requisition process in addition to the normal/standard Purchase Order Process. Refer to Requisition Process to learn more about the feature before deciding to utilize.
Access the switch by navigating to Admin → System Switches → Purchase Order → Default Account Codes
Toggle the switch on to utilize the feature (it is defaulted as off for systems)
Click Save
Duplicate Invoice Numbers
When receiving lines on a purchase order, invoice numbers can be added. This system switch will either produce a pop up warning or not when a duplicate invoice number in the same facility for the same vendor on different purchase orders is entered.
When turned on, if a duplicate invoice number is entered for the same vendor in the same facility that exists on a previous PO, the system will provide a pop up warning and ask the user if they’d like to continue.
Auto Close Purchase Orders
This system switch controls how purchase orders are closed when the final open line is received. When turned on, the system will automatically close the purchase order without prompting once all items are received. When turned off, the system will continue to display a prompt asking if you want to close the purchase order manually.
Access the switch by navigating to Admin → System Switches → Purchase Order → Auto Close PO’s
Toggle the switch off or on (it is defaulted to ON)
Click Save


