
Adding Assets
There are four methods that you can use to add a new asset to the RTA platform.
You can use the “VIN look up” feature and add the asset based on VIN or you can create a new asset.
Add the asset using another created asset as a template so it pulls in relevant fields for you
Building the asset individually
Using an asset import to pull in assets in bulk
Once the asset is added, the record contains multiple tabs. It will not be necessary to enter information in every tab or every field at this time unless desired. The goal of this document is to get up and running quickly.
For information on the additional tabs and fields that can be utilized for asset files, please visit Asset File Table of Contents.
This article will cover how to add assets in RTA using the two methods mentioned above.
Adding an asset using the Look Up VIN process
Click Assets from the RTA Menu on the left
From the Asset Search page, click the add button located in the upper right corner of the page

Type or paste the VIN in the Look Up VIN box and click “Find”
Below the lookup, the asset information should display if found
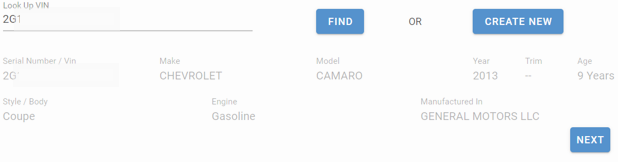
Click Next
The VIN, Make, Model, and Years will be filled in based on the VIN search
Add an Asset Using a Templated Asset
🥳 Use templates when adding assets of the same make and model. This greatly speeds up the process of adding assets into the system because all the data from the template asset, including PM schedules and warranties, is copied to the asset being added.
The only information that doesn't come across from the template is the information unique to each asset such as meter readings, VIN/ serial numbers, license plate numbers, and PM histories.
To use another asset as a template for one being added, the desired template vehicle must already exist in the RTA software. Refer to Adding an Asset for information on adding an asset.
Does the template asset have its PM Schedules and Warranty Tracking set up already? If not, be sure that these items are included to make the most of the software and help you save money. Refer to Asset Warranty Set Up and Preventive Maintenance Schedules for more information.
To use an asset as a template for another, follow the below.


Click on Assets from the side menu
Click the + sign to add another asset
Look up the asset by VIN or create new
Click Apply Template
Search for the asset number or description to be used as the template
Check the box to include user definable and custom fields if wanting to pull that information into the asset being added
Click the select button next to the asset being used as a template
The asset number being used as a template should appear next to the apply template link
Click create
Adding an Asset using the Create New Button
🖊️ Denotes a required field
Click Assets from the RTA Menu on the left
From the Asset Search page, click the add button located in the upper right corner of the page

Click the Create New Button
Enter the appropriate Asset/Asset basic information
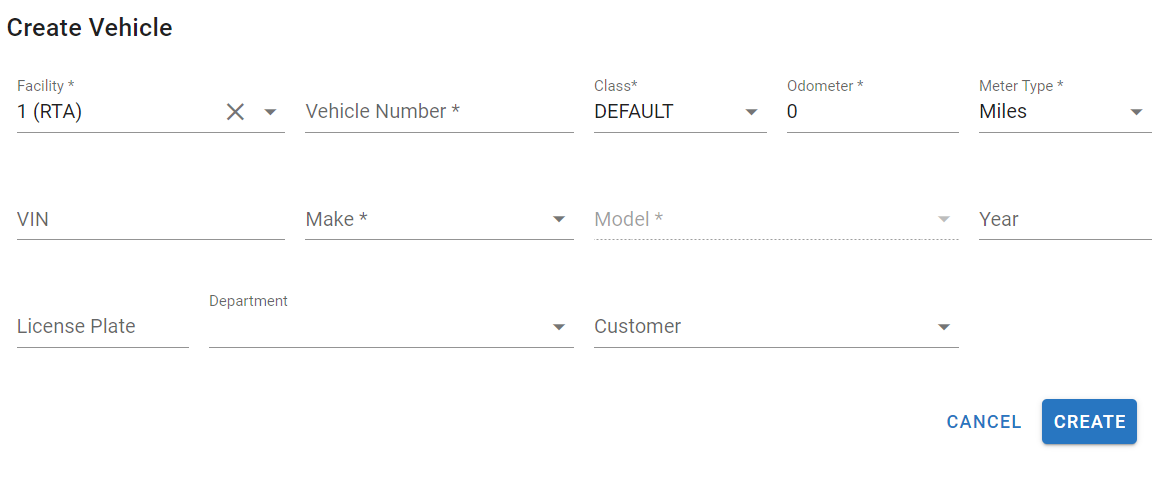
🖊️ Facility – Choose the facility to which the asset should be assigned
The facility must already exist. Refer to Facilities for instructions on how to create a facility
🖊️ Asset Number – Enter the asset number you’d like associated with this asset – this field is alpha/numeric and accepts up to 8 characters
Refer to Text Fields vs Numeric Fields for more information on best practices for selecting how to create your text and numeric fields for sorting purposes
🖊️ Class – If using specific classes – select the appropriate class or leave as default if not using specific classes
The classes must already exist. Refer to Asset Class Codes for instructions on how to create your classes
🖊️ Odometer – Enter the current Odometer reading for the asset
🖊️ Meter Type – Select the primary type of meter to be used for this asset (hours, miles, kilometers, gallons, or units)
VIN – you can include the VIN here if you’d like it as part of the asset record
🖊️ Make – Enter the asset’s make (brand of the asset)
🖊️ Model – Enter the asset’s model (name of the asset)
Year – You may enter the asset’s year (year of manufacture)
License Plate – enter the plate number for the asset if you’d like it to be part of the record
Department – Select the department to which the asset should be associated
The department must already exist. Refer to Departments for instructions on how to create a department
Customer – Select the customer to which the asset should be associated
The customer must already exist. Refer to Customers for instructions on how to create a customer
Click Create
You will receive a message at the top letting you know the asset has been created and you now can visit each tab and add additional information needed or desired for your records
Department and Customer are usually the same and necessary for adequate reporting purposes.
Be sure you set up your PM (Preventive maintenance) schedules for your assets ensuring that this cost saving feature's ability to track and schedule asset PM schedules is utilized. Refer to PM Schedules
Don’t forget to set up asset warranties in the file to save hundreds to thousands of dollars in repair costs. Let RTA help you track warranties and file claims. Refer to Asset Warranty Set Up to learn how to do this now.
Using templates when adding assets of the same make and model can speed up the process for asset adds if needing to add multiples. The data from the template asset, including PM schedules and warranties, is copied to the new asset. Refer to Template Assets if wanting to add assets using the template feature.
Using an Asset Import File
Check out Asset Import and How to Import for information on performing the import.