Cover Picture

RTA Web Vehicle - Technical Info Tab

The technical info tab holds multiple panels. One of the most important panels on this tab is the Preventive Maintenance Panel. RTA highly recommends ensuring that PM schedules are set up for vehicles and warranties to ensure timely maintenance.

This article will cover all the panels and fields found in the Technical Info tab.

You can visit Vehicle File Table of Contents to access the full list of articles related to Displayed Vehicle Data in RTA Web.

(blue star) Denotes fields that are editable within RTA Web.

Vehicle Notes Panel

This panel will allow a user to added vehicle notes. Click in the panel and start typing. Notes will remain until they are deleted.

Preventive Maintenance Panel

One of the many cost-saving features in the RTA Software is the ability to track and schedule vehicle Preventive maintenance schedules.

The PM panel can be used to add PM schedules, view set PM schedules, and export the PM schedules.

Icons on PM Panel

Viewing PM schedules in RTA Web

Once PMs are set up for the vehicle, the PM Schedule overview information will always display in this panel.

PM Schedule Overview

 Click here to expand...
  • PM – Refers to the PM Code which is used to identify the PM

  • Description – Gives a description of the PM Code

  • Status – Denotes the status of the PM based on intervals set such as not due, due soon, or overdue

  • Interval – Displays the required interval for this PM such as every xx miles or xx days

  • Last Done – Will display either the last interval type reading such as the meter reading (if intervals are by mileage) or the last date (if intervals are by days) that the PM was completed

  • Current – displays the current meter reading for the vehicle

  • Due Date – displays the next meter reading when the PM will be due based on interval type such as mileage or the next date when the PM will be due if intervals are by miles or days

PM Details

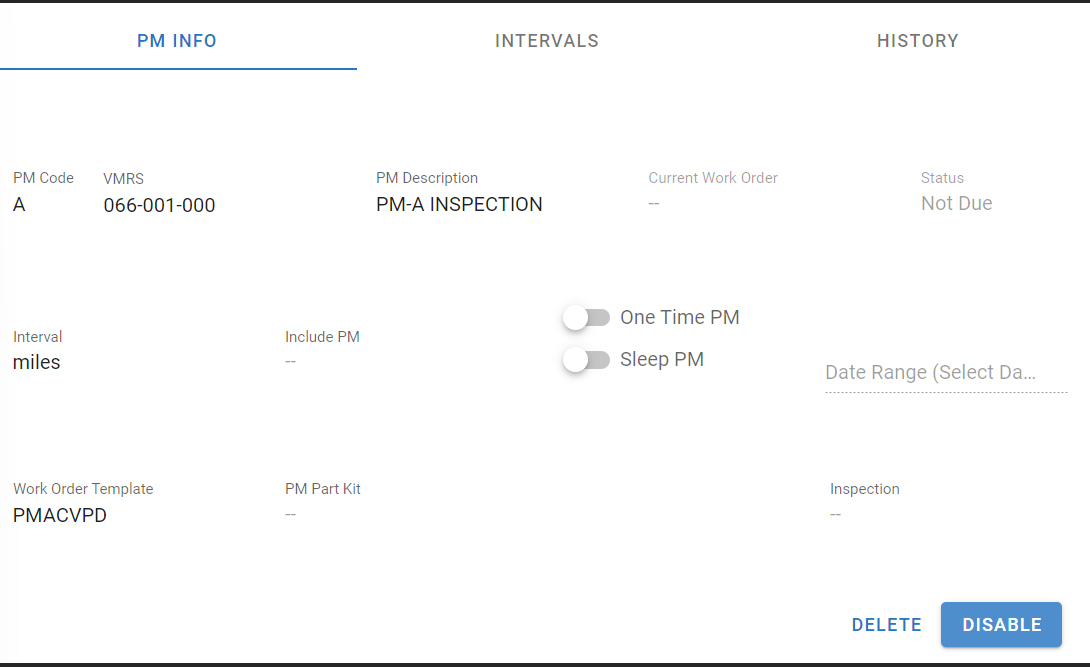
Click on the line item for a specific PM to view the full details of the PM Schedule. A secondary panel will open below the schedule overview and 3 tabs will be displayed.

Below is a listing of the tabs and fields that display which are editable after the PM is created.

Refer to PM Schedules in RTA Web for a complete list of descriptions for each field.

Editing a field requires the user to click in the field, change/add the appropriate data, and click the check mark to save the change.

PM Info Tab
 Click here to expand...
  • (blue star) PM Code

  • (blue star) VMRS

  • (blue star) PM Description

  • Current Work Order – Will display a work order number if one is currently open for the vehicle

  • Status – restates the PM status for the vehicle based on the input interval for the PM

  • (blue star) Interval

  • (blue star) Include PM

  • (blue star) One Time PM option – changes the PM to only be in effect once

  • (blue star) Sleep PM option – pauses the PM schedule until a user turns off the sleep mode unless a date range is used

  • (blue star) Date Range – available for use with the sleep mode and allows a user to input a date range for the sleep mode. Once that range expires, the sleep mode is deactivated

  • (blue star) Work Order Template - to edit this field, WO templates need to have already been established via RTA Web

  • (blue star) PM Part Kit - to edit this field, Part Kits need to have been established via RTA Desktop

  • Inspection – displays the most current inspection being performed for the vehicle

  • (blue star) Delete/Disable button – allows the user to delete the entire PM or disable it indefinitely until needing to reactivate it

Intervals Tab

Intervals will contain windows for the created intervals for the PM and allow for a second interval to be created

Below is a listing of the fields that display in the Intervals Tab.

Refer to PM Schedules in RTA Web for a complete list of descriptions for each field.

Editing a field requires the user to click in the field, change/add the appropriate data, and click the check mark to save the change.

 Click here to expand...
  • (blue star) Lock Icon

  • (blue star) Scheduled

  • (blue star) Tolerance

  • Last done – reiterates the interval when the last PM was completed

  • Current – reiterates the current meter reading

  • Next due – reiterates the meter reading for the next PM based on interval

  • (blue star) Add New - allows a user to set up a secondary interval for a PM. For example, perhaps the oil change needs to be done either at xx miles or xx days; whichever occurs first 

History Tab

The history tab will display a report or list of the PMs performed on the vehicle over time. Users can customize columns and export the data to Excel and PDF.

Refer to Customizing List Columns for instructions on customizing columns and Exporting Lists for exporting files from RTA Web

Fluids Panel

Most fields in the Fluids Panel are editable within RTA Web.

The “Unit” fields that are not editable in the Vehicle File and are driven by the “Unit of Issue” value associated with the added part on the part record. If there is no part or no unit associated with the part file, then it will default to QT. Refer to Parts Inventory Tab for more information on Unit of Issue.

Editing fields will require the user to click in the field, select the appropriate value, and click the check mark to save the added value.

 Click here to expand...
  • (blue star) Fuel Fields

    • Fields include Fuel Type, Fuel Tank Capacity, Average MPG, and Highway Tax %

    • Fuel Type – Select the fuel type used by this vehicle or the primary fuel type if the vehicle can use multiple types of fuel

      • RTA comes with 9 pre-defined fuel types to select from. If more are needed for use, they will need to be created in RTA Desktop. Refer to Fuel Types for adding or editing Fuel Types

    • Fuel Tank Capacity – Enter the maximum fuel quantity this vehicle can hold

    • Average MPG – Enter the estimated miles per gallon for this vehicle

    • Highway Tax % - Enter the highway tax rate for this vehicle if applicable

The remaining fields include the fluid type and the capacity for this vehicle. The fluid types that are available for input are driven by parts added to the RTA platform. Refer to Adding a Part for adding parts if the appropriate part is not available in the drop down.

  • (blue star) Oil Fields

    • Select the appropriate part type

    • Enter the quantity of oil for the vehicle

  • (blue star) Gear Oil Fields

    • Select the appropriate part type

    • Enter the quantity of oil for the vehicle

  • (blue star) Transmission Fluid Fields

    • Select the appropriate part type

    • Enter the quantity of oil for the vehicle