RTA Web Parts - Information Panel
The primary information panel that is visible after selecting the part in RTA Web lists all of the primary information for the part record. This article will focus on the fields contained within the primary panel.
Once a part has been selected, the part number will be listed at the top of the screen so that the user can always verify the correct part is being reviewed and/or edited.
The primary part panel will always be visible regardless of the tab you select in the part file.
Refer to Parts File Table of Contents to access the full list of articles related to Displayed Part Data in RTA Web
as well as Adding a Part for detailed summaries of each field
![]() Denotes fields that are editable within RTA Web.
Denotes fields that are editable within RTA Web.
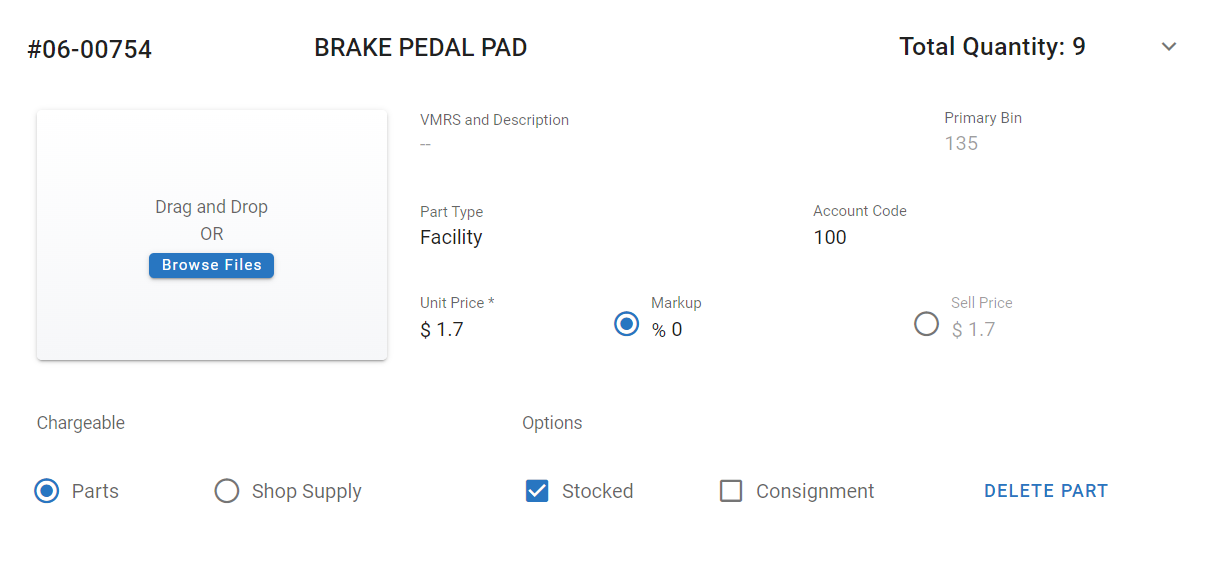
 Part Number – The number assigned to the part when added to RTA system (Up to 25 characters)
- Description – The part description entered when the part was added to RTA system (Up to 40 characters)
- Total Quantity – Total on hand in inventory
- Profile Picture – a picture that is associated with the part can be added by dragging and dropping a file or by clicking browse files and selecting a file from your computer
- VMRS and Description – VMRS code associated with the part
- Primary Bin – The Bin/location area for this part
- Part Type – The RTA System separates vehicle costs and usage into eight categories (shown below). More may be added through RTA Desktop. Refer to System Codes for instructions on adding more.

- Account Code – If used, this field can display the general ledger account number or other information for accounting purposes (up to 25 characters)
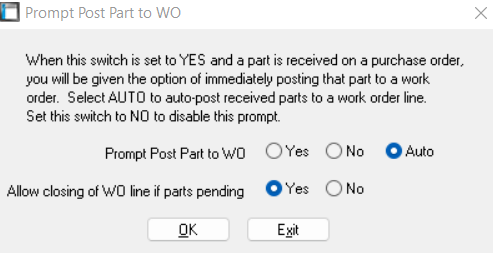
The information entered in this field can be used in Purchase Orders if the appropriate switch is set to yes in RTA Desktop
In RTA Desktop, click on the System pull down

Click on Set Up System Switches
Click on Main System Parameters
Enter Level 3 Password
Click on Parts Parameters Tab
Enter line number 34 at the bottom and press enter

Set this switch to AUTO to automate the process of posting parts to work orders. In order to use this feature "Prompt WO Number" should also be set to YES, but is not required (switch 32). As each PO line is received, you'll have the option to auto-post the part OR receive the part to stock
If you choose Auto-Post, the system automatically posts the entire quantity ordered on the PO line to the specified work order and work order line
Set this switch to NO to skip this prompt and always receive parts to stock
- Unit Price – The per unit cost for the part when purchased from the vendor
- Markup – Displays the percentage markup generated for the part when applied to a work order
- Sell Price – Displays the total sell price for the part which would include the markup percentage if one is entered
If no mark up is entered, the sell price should be checked
Chargeable Options Displayed
- Parts - if selected, items will be noted and charged to work orders to which they are applied
- Shop Supply - if selected, this part is something either
not chargeable because its cost either cannot be associated with one specific job (ie. safety goggles) or
its cost is so diminutive individually, that it is too difficult to associate with one specific job (ie. solder, bolts, etc.
Options Displayed
- Stocked - if selected, RTA creates requisitions for stocked parts when the inventory level falls below the reorder point set in the Inventory tab
- Consignment – if selected, this part is flagged as a consignment part and the option exists of including or excluding their values from part inventory lists