RTA Web Parts - Adding a Part
Parts can be added in RTA Web through the Parts Menu. The record contains multiple tabs. It will not be necessary to enter information in every tab or every field at this time unless desired. The goal of this document is to get up and running quickly.
This article will cover only the necessary items needed to get a part added into RTA. Please refer to the link above for information regarding all of the tabs and panels available for use. While additional tabs are optional, we HIGHLY recommend also visiting the bottom section which suggests additional items to consider entering to save money and time.
Follow the below steps to add a part in RTA Web:

Primary Part Panel
Click here to expand...
Select Parts from the menu
Click + to Add Parts

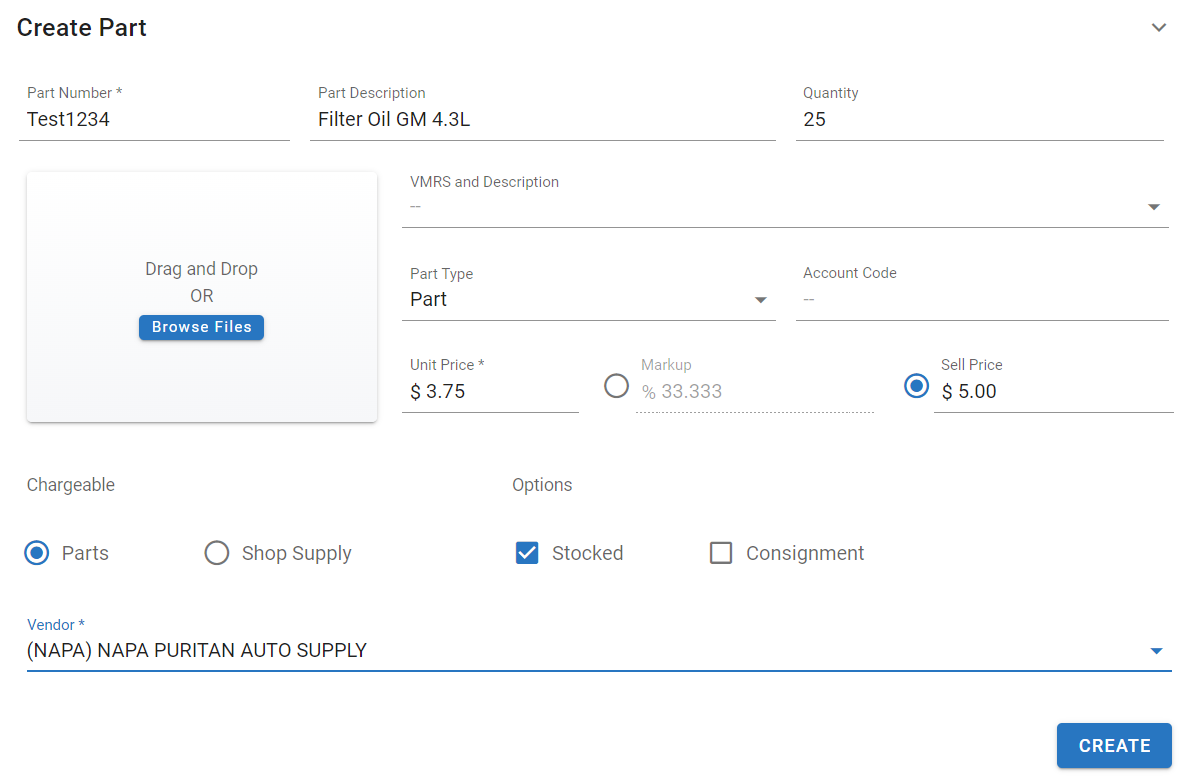
Add a profile pic of the part if desired. Refer to Parts - Profile Pic
Give the Part a Part number - up to 25 characters - omit spaces
If planning to use barcodes now or in the future, do not use the / or # or & characters in the part number as this could cause errors with barcoding
Enter a part description - Up to 40 characters - This will be used for search and sort purposes. We suggest using a consistent format. Also include viable descriptions to make it easier when attempting to find parts. For example, there may be multiple oil filter types. Ensuring the descriptions indicate the specific type can save time.
Start like items with the same header so they pull together when sorting
For example, all filters should start with the word Filter and then have the rest of the description after it see samples below
Here are some examples to ensure that sorting and locating the right part is easier for everyone
Filter Oil Ford F150 4.6L
Filter Oil GM 4.3L
Filter Air Cabin Toyota 1GRFE 0209
Filter Air Napa Gold Ford 6.7L
Oil Motor Semi-Syn SAE 5W30
Oil Syn Gear 75W90 API GL5
Enter the current Quantity on hand
Select a VMRS code if this part will have a part warranty
Select the appropriate Part Type - Most parts will fall into the Parts category
The RTA System separates vehicle costs and usage into eight categories. More may be added through RTA Desktop. Refer to System Codes for instructions on adding more.
Enter Account Code if applicable - up to 25 characters - can be used to denote a general ledger account number for accounting purposes
The information entered here is used in purchase orders if the "Use Account Codes" switch is set to YES or VALIDATE in RTA Desktop - (System - System Parameters - Parts Parameters Tab - Switch 36)
Refer to Parts Information Panel for further descriptions on this field
Enter the Unit Price for this part based on the primary vendor price
If a markup is desired when the part is charged out on a work order, add the markup percentage
If there is no markup the Sell price will list the same as the unit price. If there is a markup entered, the sell price will include the unit price plus the markup percentage
The sell price can be adjusted as well by clicking in the radial button and entering a flat sell price. Doing so will automatically adjust the markup percentage
Select the applicable Chargeable Field:
Parts - if selected, items will be noted and charged to work orders to which they are applied
Shop Supply - if selected, this part is something either
not chargeable because its cost either cannot be associated with one specific job (ie. safety goggles) or
its cost is so diminutive individually, that it is too difficult to associate with one specific job (ie. solder, bolts, etc.
Select the applicable Options Field:
Stocked - if selected, RTA creates requests for stocked parts when the inventory level falls below the reorder point set in the Inventory tab
Consignment – if selected, this part is flagged as a consignment part and the option exists of including or excluding their values from part inventory lists
Choose the primary vendor for the part
A part can have multiple vendors associated with it and these vendors can be ranked in terms of primary and then so on
Only one primary vendor is selected at the time of part file creation
Additional vendors can be added after the part file is created
Vendors have to be created in RTA Desktop prior to them being add to a part file.
To add additional vendors, do the following: Refer to Vendors for more information on the Vendor Panel in the part file
Click the + button in the Vendor Panel
Enter the vendor name to be added to the part file (as you start typing, you should see likely matches from the created vendors)
Click the appropriate vendor
Enter the Vendor Part Number (this is the number the vendor uses for this specific part)
Enter the pricing (either as a single unit or bulk pricing)
Enter a manufacturer if desired
Click Save
Click Create


