Review Driver Reports
(For RTA Version 7.3 and newer)
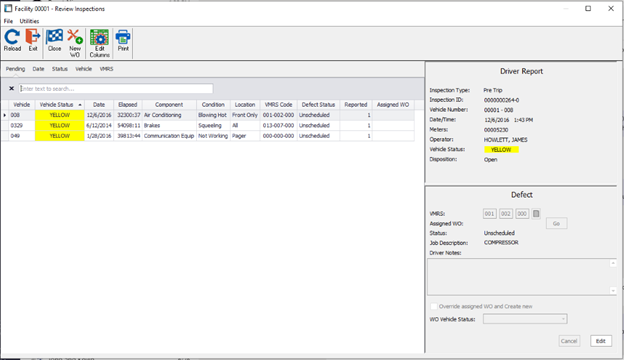
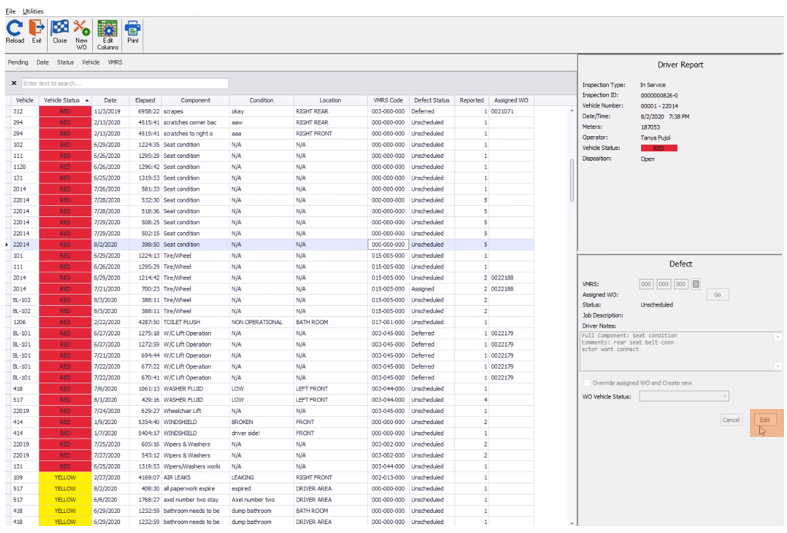
Once Driver Inspections have been input into the system, it will be up to the shop supervisor or lead technician to review the reports on a regular basis and create work orders as needed. To review Driver Reports, select WOs > Drivers Report Maintenance > Review Driver Reports from the RTA main menu (WDD) and specify the facility number. A window similar to the following will be displayed:
This screen consists of 3 main areas: The Grid Panel, and the Information Panel, and the Toolbar.
The Grid Panel
After verifying the Facility number, the user will be prompted to input the inspection number. The default is the “Pending” inspections but can be altered with the top-left menu preference.
This list contains all Unscheduled defects, in addition to any Assigned defects that are duplicates of an Unscheduled defect.
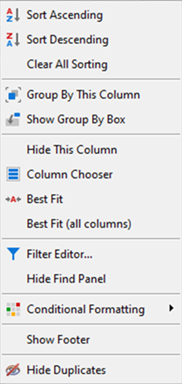
Also available from this menu is the Column Chooser, which allows the user to select additional columns to view by double-clicking the name or dragging the name to the grid. The columns can be rearranged, sorted, and filtered.
The Find Panel is available for the user to search the list. It can be shown or hidden using CTRL-F, or by selecting Show Find Panel or Hide Find Panel from the column header right-click menu.
The Information Panels
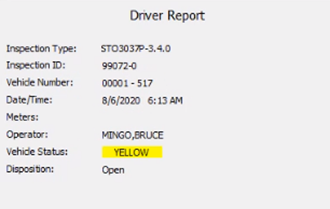
Due to the number of columns, it is sometimes difficult to see a complete row of information without scrolling the window. The Driver Report panel and the Defect panel to the right of the grid panel display information in an easy-to-read format. The information in these panels is also contained in columns, should the user desire to see the information in that format.
The information is updated as the user clicks on or uses up/down arrows to move to a new row. Buttons in the Defect panel become enabled, depending on the Defect Status of the row. For example, a defect with an assigned WO will show the Go button enabled, allowing a user to click the button to display that WO. For an Unscheduled defect, the Edit button becomes enabled, allowing the user to edit the information in the Defect panel.
An F1 lookup button sits to the right of the boxes that hold the VMRS code, and the VMRS lookup can also be launched by pressing the F1 button inside any VMRS box.
The Driver Report notes can be edited for Unscheduled defects. The notes are limited to 300 characters.
The Toolbar
The new toolbar has fewer buttons. Some functionality was moved elsewhere for convenience with the new layout.
The
Close button and the New WO button work for both single-line and multi-line processing.
The
Edit Columns button allows a user to launch the Column Chooser directly, bypassing the column header right-click menu. This button functions the same as for the F1 lookup.
The
Print button will work for single-line processing only
The
Reload button allows a user to refresh the loaded defects at will. The data is refreshed as edits are saved, WOs are created, and defects are closed.
View Options
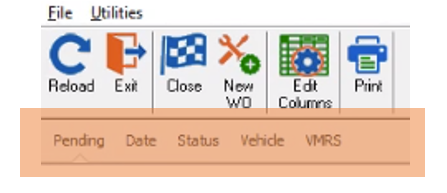
From the Launch Review Driver Reports screen, you are able to toggle the view format with 5 options: Pending, Date, Status, Vehicle and VMRS. These options will automatically rearrange the format of your Driver Reports data, then can be edited for a one-time view as needed with the traditional F1 List edits.
Creating or Linking a Work Order
Select the driver report line to view in the “Driver Report” viewer (top right) the details of the report.
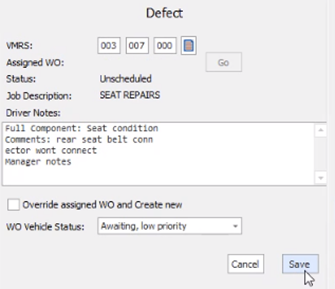
With the proper line selected, you can use the “Defect” view to establish a VMRS code (F1 lookup list enabled) and add/edit any notes placed on the original Driver Report. After selecting the line, simply click Edit in the Defect box and input the needed data. From here you can also assign the Work Order vehicle status.
When the VMRS codes and Notes have been added, click Save
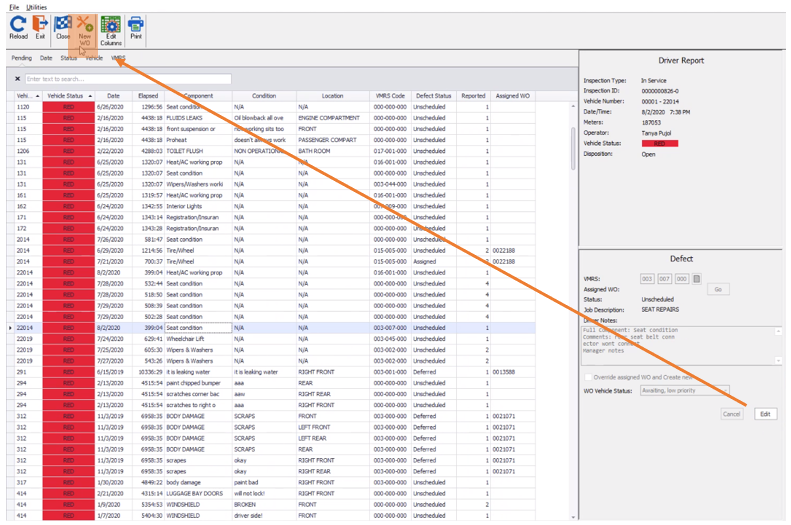
You can now Add a new Work Order as needed with the line selected, click on New Work Order in the top menu. This will create the Work Order and move the status of the Driver Report line to from Unscheduled to Assigned.
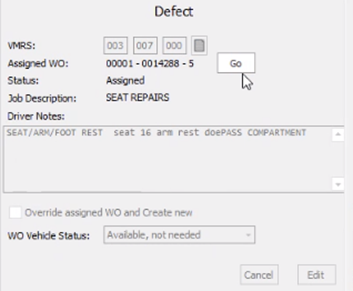
When a work order is assigned, you can actually view/edit/close it from the Driver Reports screen if desired. The Work Order details will be added to the Defect screen with the option Go next to it. If you click on Go, you’ll be brought to the Work Order screen to post, edit, view and even close the Work Order as normal. Exiting back from the Work Order will bring you back to the Driver Reports screen.
Pro Tip:
If you desire to create one-Work Order for multiple Driver Reports lines, you can use Shift or Ctrl on your keyboard to highlight multiple lines and select New Work Order at the top of the screen. All will reappear when refreshed as Assigned.
Once the Work Order is closed through the Work Order process, the Driver Report will be resolved and set to Closed.
The first time a problem is reported in the Driver Reports module, you will need to assign a VMRS code. The next time that same problem is reported, whether it is for the same or different vehicle, the system recalls the previously assigned VMRS code and automatically uses that as the default VMRS code. This eliminates having to manually assign a VMRS code every time a problem is reported since in most cases, the previously assigned VMRS code will still be applicable. For example, if a VMRS code of 015-001-000 is assigned to a problem of Steering/Add Fluid (where Steering is the Component and Add Fluid is the Condition), the next time Steering/Add Fluid is used in a Driver Report, 015-001-000 will automatically be assigned as the VMRS code. If, instead, Steering/Alignment is the reported problem, a different VMRS code will be assigned to the Driver Report. If you ever need to change the default VMRS code, simply bring up the window shown and make the change as needed.
Disable Search and Create New WO: If checked, the search ability is disabled and the defect will be opened on a new repair order. If left unchecked the system will search the open work orders for the vehicle to see if there is a pre-existing line for the repair code. If one is found it will be displayed in the assigned WO column. When the the create assign WO process is started the defect will be linked to the pre-existing work order.
Notes: The notes will be filled in with the information provided by the driver. Additional notes can be specified at this time. These notes will appear on the work order once it is created.
Handling defect reports where no work order is required
The close defect button on the toolbar allows the user to close a defect for any of the following reasons:
· Defect need not be repaired for safe operation
· Invalid or incomplete component/condition information reported
· Driver responsibility
· Defect repaired
· Quick repair
The user will be prompted for the reason and his ID in order to close the defect report without creating a work order.
For details on syncing DVIR attachments through the GeoTab > RTA integration, please see
